Event Registration Feature
KidCheck’s Event Registration allows parents to pre-register children for your organization’s special events. Administrators set parameters for each event, such as event name, date, capacity, and price. Accept payments at the time of registration via PayPal Payments Pro.
Parents register their children using their existing KidCheck account or create a new account and register in one step. Admins can view the list of registered kids, pre-assign locations to children, and more to prepare for the event.
In this tutorial, you’ll learn to:
Create a New Event
To create a new event in KidCheck:
- Sign into your KidCheck admin account
- Select the Event Registration tab
- In the Events tab, select +Create New Event
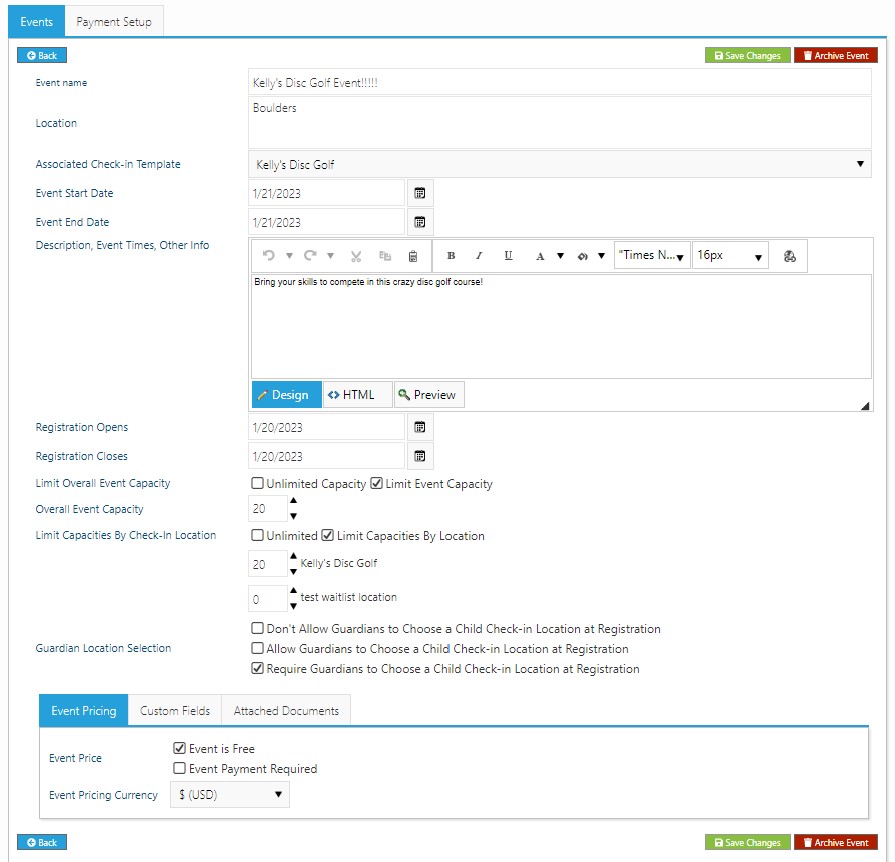
- Complete the details regarding your new event:
- Give your event a name (this is how it will be displayed to the public)
- Provide a location for the event (optional)
- Assign your event to a Check-in Template (you may want to create your template first if it is a unique event)
- Enter the event's date(s)
- Provide a description or give more details about your event including time (optional)
- Specify the dates when you want to allow people to register, and when registration closes
- Specify an overall event capacity
- Choose to limit capacity by each location (locations populate from the template your event is associated with)
- Choose to require guardians to select a child's location when registering
- Choose whether to display a fee for the event. If desired, create price discounts by:
- Registration date (e.g. early bird registration discounts)
- Multi-Child Discount (e.g. provide a discount to large families)
- Choose whether or not you wish to accept online payments (requires a PayPal Business or Premier account, along with the PayPal Payments Pro Service)
- When complete, select Save Changes
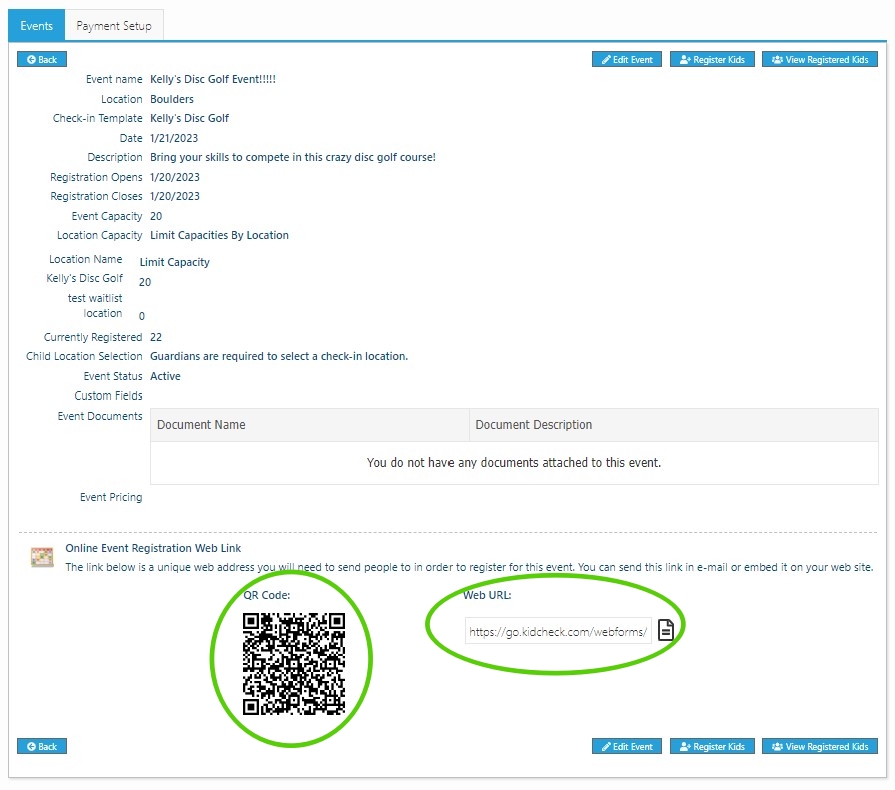
Once the event has been created, KidCheck generates a custom URL and QR code which you can email to parents or add on your website:
- When Parents follow the link, it will immediately take them to the KidCheck login page. After they log in, it will bring them to a unique page for your event where they can select their children and complete registration.
- If the parent does not have a pre-existing KidCheck account, KidCheck will walk them through creating an account then register kids for the event in one workflow.
- For a video walk through on creating an event, click on this link - How to Setup Event Registration
Create Custom Fields and Questions
KidCheck's Event Registration makes it easy to ask guardians for additional information at the time of registration. You can ask for each child's t-shirt size, buddy requests, and more. To create a custom field for your event:
- Under the Event Registration tab, click on the name of the event, and select Edit Event
- In the Custom Fields tab in the bottom section of the event, select +Add New Custom Field
- Fill in the name field, description field, and choose to require the field to complete registration (optional)
- Select the Save link to save the field
- Select Save Changes
While registering, guardians will be prompted to complete custom fields for each child he/she registers. Admins can view responses to custom fields by visiting the Registered Kids list of an event or on the "Event Registration - Class Roster" report.
Attach Documents for Download
Attach documents for download when guardians view an event's info page. This is handy for helping parents easily access items like release forms and event flyers.
- Under the Event Registration tab, click on the name of the event, and select the blue Edit Event button
- In the Attached Documents area of the bottom section, select the Select button then choose the file from your computer
- Customize the Document Display Name and Document Description
- Select the Upload File button
- Select Save Changes
- The document can now be downloaded by guardians when viewing the event's unique URL
- Click back return to your event info and confirm your attached document
Edit an Event
To edit an existing KidCheck event:
- Select the Event Registration tab
- Select the name of the event you'd like to edit
- Select the Edit Event button
- Update event information as desired
- Select Save Changes
Manage Registered Children
- Under the Event Registration tab, select the name of the event
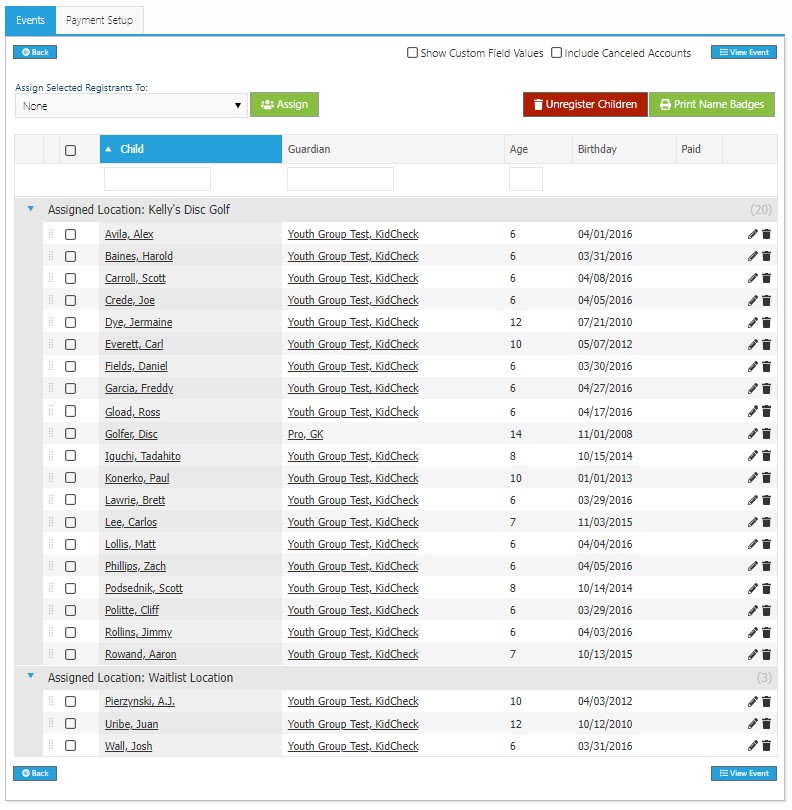
- Select the View Registered Kids button
- To sort by a column, click on that column's title
- To pre-assign children to specific locations, select the checkbox to the left of the child's name, select the desired location from the location drop-down (Assign Selected Registrants To option), and select the Assign button. Assigned children will now show up in groupings based on their location. To reassign them, simply select and drag onto the new location. During check-in on the day of the event, children's locations will automatically select according to this list.
- To view a child's custom field information, select the Show Custom Field Values checkbox at the top of the list
Register Children on Behalf of a Guardian
Admins can register kids for an event on behalf of KidCheck guardians.
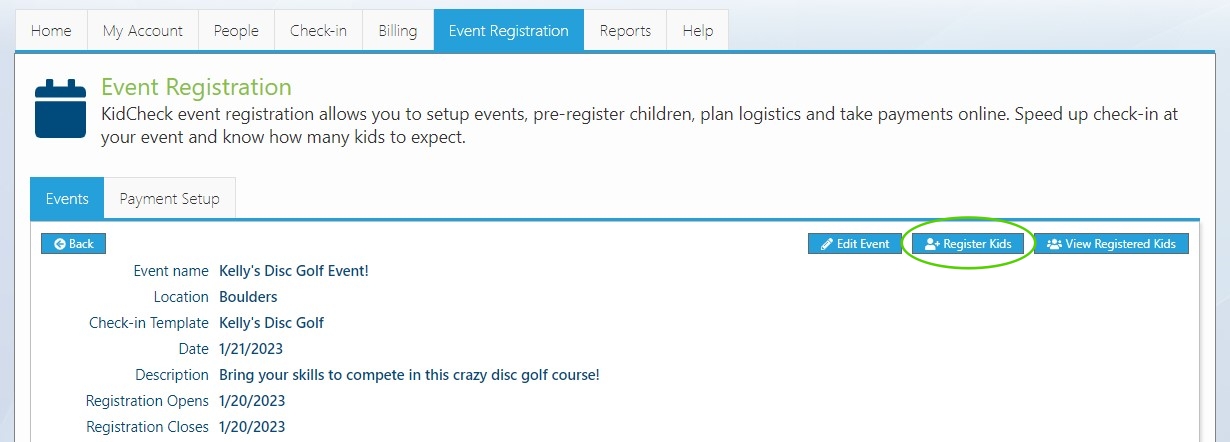
- Under the Event Registration tab, select the name of the event
- Select the Register Kids button
- On the modal that opens, search for the guardian's phone number (only guardians with existing KidCheck accounts can register for an event - create new accounts using the Registration Assistant)
- A new tab will open where you can register children as if your are their guardian (payment is optional for admins registering a guardian's children)
- Upon successful registration, a modal will open allowing you to email a registration receipt to the guardian
- Close the tab to return to your regular event page
Integrate an Event with PayPal Payments Pro
If you’d like to charge a payment for your event, KidCheck’s Event Registration feature integrates with PayPal for collecting event fees at the time of registration. First, you’ll need to sign up for a Business PayPal account (if you don’t have one already), and you’ll need to sign up for the PayPal Payments Pro service (which does have an additional monthly cost). Visit PayPal for more information about PayPal Payments Pro, and to sign up.
After you’ve created your PayPal account and signed up for the Payments Pro service, you’ll need to enter your PayPal API credentials into KidCheck. To do so:
(in KidCheck)
- Under the Event Registration tab, click on the Payment Setup tab
- Choose +Add New PayPal Account
- Type a name and description for this payment account
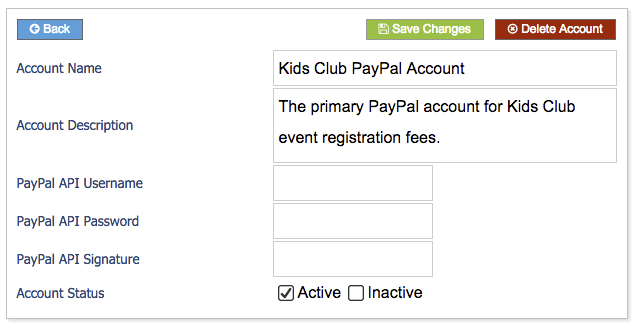
- To get your PayPal API info, follow steps 5 - 14
(in PayPal)
- Log into your PayPal Business account (with Payments Pro add-on)
- Click the My Account tab
- Click the Profile tab (you may need to verify your account before proceeding)
- Depending on your type of account, either:
- Under Account information, click Request API credentials (or)
- Click on My Selling Tools, and then click Update next to 'API access'
- Click Set up PayPal API Credentials and Permissions
- Click Request API Credentials
- Click Request API Signature
- Click Agree and Submit
- Copy and paste the API credentials into your KidCheck payment setup tab from step 4
- Click Save Changes
View Event Registration Reports
Several reports are available to help you manage your event:
- Select the Reports tab
- Under Available Report Library, you have eight different event registration reports to choose from (Event Registration - Class Roster, Event Registration - Guardian Info, and Event Registration - Self Check-in Name Badges are some of the most popular for event use)
- Each report has a brief description. Click on the name of the report to view.
- Alternately, custom event registration reports can be created using the report builder tool under the Reports>Custom Reports tabs (for more information, please view the video tutorial, or the visit the written Custom Reports tutorial).
