KidCheck PrintHub Setup (for 2nd & 3rd Generation PrintHub Devices)
If you are setting up an original KidCheck PrintHub, instructions are found here. If you are setting up the ExpressHub, instructions are found here.
Before setting up your KidCheck PrintHub, be sure to attach the Panda Wireless WiFi adapter to any USB port of the PrintHub.
Set up using one of five options:
-
Set Up Using as an Access Point
-
Configure the PrintHub from a browser using the IP Address
-
Let the PrintHub Automatically Add Itself
-
Add by a Manual Scan via go.kidcheck.com
-
Set Up via Console App (via HDMI monitor / keyboard)
-
Set Up Using as an Access Point
- Plug the PrintHub into power and wait for it to fully boot (wait for the LCD screen to say “Connecting…”).
- From a computer, iPad, smart phone, etc., connect to the “KidCheck PrintHub” WiFi network (the name may vary slightly).
- Open the KidCheck PrintHub Setup app (found in the Apple App Store or Google Play Store) OR open your browser and go to 10.0.0.1 as you would any website (you can alternatively use 172.16.32.64).
- Enter the configuration password if prompted (found in the PrintHub packaging or in here in settings).
- Select the WiFi section to add the PrintHub to the desired WiFi network (if you plan on running it on WiFi).
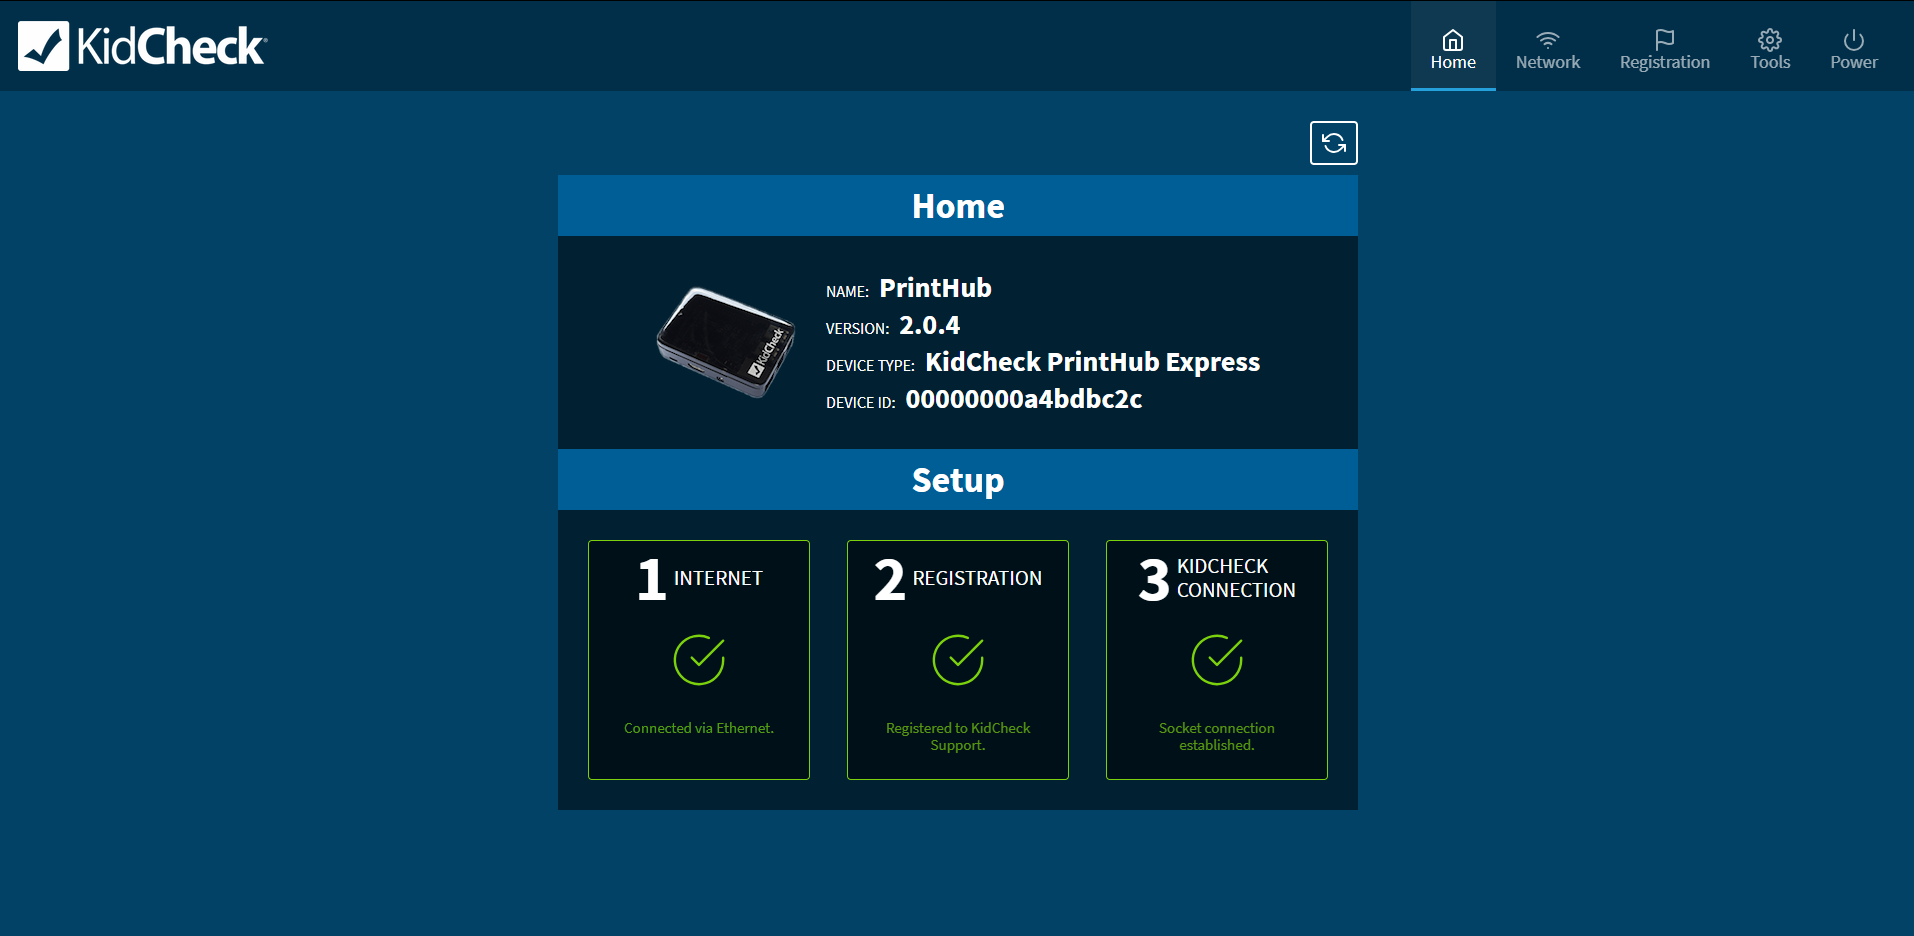
Select the appropriate areas to connect your PrintHub to WiFi, register it to your account, etc.
- Select the Registration area and enter your KidCheck username/password to register the PrintHub to your organization.
- Your PrintHub is ready to use. (You can select the other areas to further configure it.)
For a video walk through on how to setup your PrintHub Express, click this link – How To Setup You PrintHub Express .
-
Configure the PrintHub from a browser using the IP Address
- Connect the PrintHub to an active Ethernet connection on your network. Plug the PrintHub in to power.
- Once the PrintHub fully boots up you’ll see an IP address displayed on its LCD screen (something like “192.168.202.172”).
- Put that IP address into the browser of a device on that same network and select “Enter” (as if it’s a website).
- Select the WiFi section to add the PrintHub to the desired WiFi network (if you plan on running it on WiFi).
- Select the Registration area and enter your KidCheck username/password to register the PrintHub to your organization.
- Your PrintHub is ready to use. (You can select the other areas to further configure it.)
-
Let the PrintHub Automatically Add Itself (must have computers on that network running the KidCheck Client)
- If you have computers on the network (with Windows or Mac OS) running the KidCheck Client, connect the PrintHub to an active Ethernet connection.
- Wait 5 minutes.
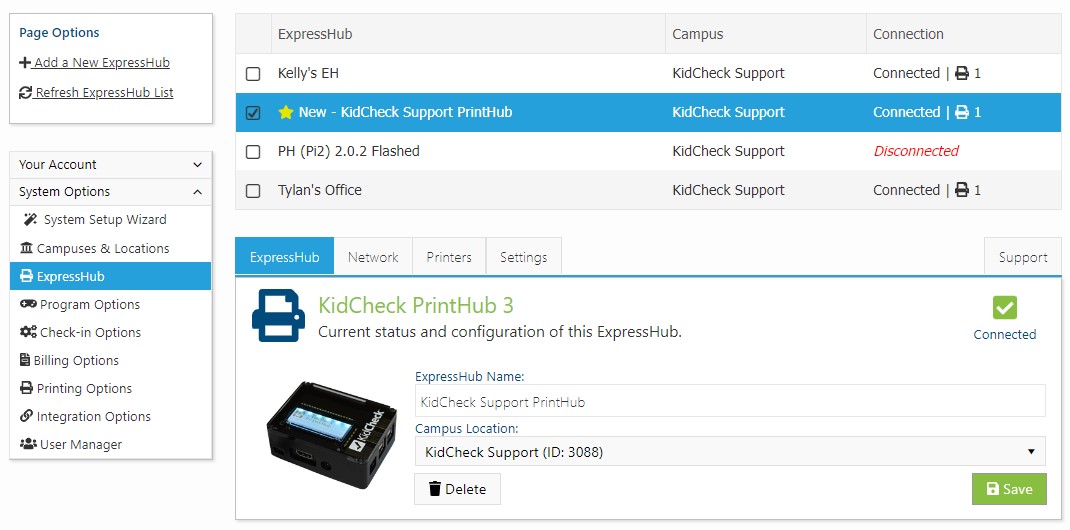
- Check the ExpressHub settings (System Settings > System Options > ExpressHub) within go.kidcheck.com. The PrintHub may automatically add itself to your organization (you might need to select Refresh ExpressHub List for the new PrintHub to show).
- If the PrintHub is automatically added, you can select it and select the appropriate areas to add it to WiFi and further configure it.
-
Add by a Manual Scan via go.kidcheck.com
- Connect the PrintHub to an active Ethernet connection on your network.
- From another device on the same network, login to go.kidcheck.com and go to the System Settings > System Options > ExpressHub.
- Select +Add a New ExpressHub from the left (under Page Options).
- If your device’s IP address automatically populates in the new window, select Start Scan to search for your PrintHub on that network. If the device’s IP isn’t automatically populated, look up the device’s IP, input it in the appropriate field, and select Start Scan.
- Name the found PrintHub, select your Campus, and select Save Discovered Printers.
- Close that tab. Choose Refresh ExpressHub List to update the ExpressHub settings pane.
- Select your PrintHub and select the appropriate sub-tabs to add it to WiFi and further configure it.
-
Set Up via Console App (via HDMI monitor / keyboard)
- Connect the PrintHub to an HDMI monitor or television. Connect a USB keyboard to the PrintHub.
- Plug the power into the PrintHub.
- Once the PrintHub fully boots (the on-board LCD screen will say “Connecting…”), use the onscreen menus to connect the PrintHub to WiFi via the Network menu.
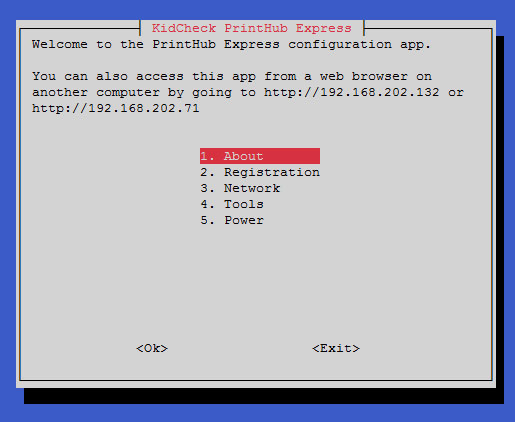
Select the “Network” area to add your PrintHub to you WiFi network.
- Once the PrintHub is online, register it to your customer account via the Registration menu. You will be prompted to input your KidCheck username/password to register the device.
- Once online and registered, your PrintHub will be ready to use. You can further configure it from the Settings area at go.kidcheck.com.