Mobile Printing using the KidCheck Client / Computer
General Setup
Getting Started
- Confirm the KidCheck mobile app is installed on your tablet (if you need help with this, visit the Mobile Check-in Setup tutorial)
- Confirm there is a Windows or Mac-based computer connected to your network, and that the KidCheck Client has been installed and is running (for more help, see Install the KidCheck Client)
On the Computer
- Plug your label printer(s) into the computer running the KidCheck Client (or use a KidCheck ExpressHub to use your printer separate from a computer)
- Confirm that the printer is working property by printing a test label from the KidCheck Client
On the Tablet
- Sign into the KidCheck mobile app with your administrative account
- Under the Check-in tab>Use As Check-in Station option, tap on the template or program you’d like to use
- On the printer selection page, tap the Discover Printers button
- After the discovery process is complete, you should see your printer(s) listed, and can select the one you’d like to use for check-in
Troubleshooting
If no printers appear after the discovery process is complete, the following steps can be handy:
Restart the KidCheck Client
On the computer, exit and restart the KidCheck Client (or, if you’re unfamiliar with how to do this, you could also simply restart the computer). Once everything is back up and running, try tapping the Discover Printers button again.
Add Printers Manually Using an IP Address
If you are still not seeing printers after restarting the KidCheck Client, you can manually add printers by entering the IP address of the computer running the KidCheck client that is connected to your printers. To find a computer’s IP address:
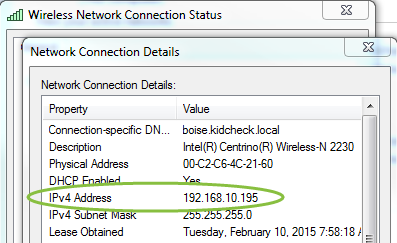
Windows
- Go to Control Panel > Network and Internet > Network and Sharing Center
- Click on your active network connection – a new window will open
- Click on the Details button of the window – another new window will open
- Find the IP Address in the IPv4 Address field
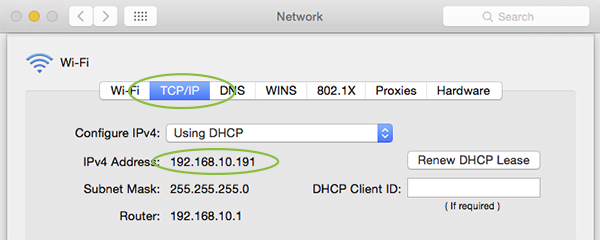
Mac
- Under the Apple menu (in the upper left), choose System Preferences
- Click the Network icon
- Select your wireless network, and click the Advanced/Details button
- Under the TCP/IP tab, locate the IPv4 Address field
Back on the printer selection screen in the KidCheck Mobile app, select the Add a Printer button, and enter the IP address (including “.” characters, in this case: 192.168.10.191). If it works, you’ll see the printers in your list ready to be used for check-in.
Re-Configure How IP Addresses are Assigned on Your Network
If you are consistently having to add printers manually by entering the IP address, chances are your network is assigning IP addresses in a way that is not compatible with KidCheck’s mobile printing discovery process.
In order for printers to be discovered, the tablet device and the computer running the KidCheck Client (that your printers are connected to) need to have matching IP addresses through the first three sets of numbers:
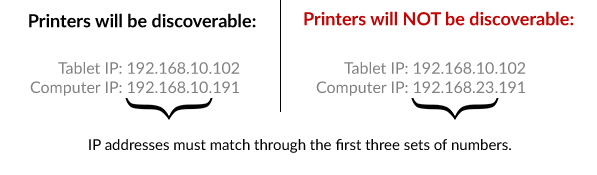
If your network is consistently assigning IP addresses in a way that causes printers not to be discoverable, it is possible to change the pattern by which IP’s are assigned. Specific directions on how to accomplish this with your network hardware are beyond the scope of this tutorial, please check with your organization’s network administrator for further help.
Need Further Help?
As always, please contact KidCheck Support if we can be of any assistance.