Worker (Volunteer or Employee) Check-in
Adding a Volunteer/Employee
Before adding a person as a worker, the volunteer/employee will need to first create a KidCheck account if they they do not have one. He or she can do so by visiting go.kidcheck.com, from a check-in station, or via the KidCheck mobile app.
Next, the KidCheck Administrator will need to designate him or her as a volunteer/employee. This can be done from several places:
Add via People Area of go.kidcheck.com
Note: If the worker has not already created a KidCheck account, he must create an account before adding them via this method. Have him create an account first, or add him from a check-in station as he creates an account (see below).
- Sign into KidCheck at go.kidcheck.com
- Go to the People tab within KidCheck (top row).
- On the second row of tabs, select the Workers tab.
- Click on + Add A New Worker on the left and input the volunteer/employee’s phone number (omit dashes and parentheses), and click Search.
- Once you see the person’s name/profile show up, select Add as Worker, choose whether they are an Employee or Volunteer, and if you want to add an Admin Security Role (through the check box and next settings) and select Save. See example of settings below.
- Please remember this searches our international database, so please cross reference address and phone numbers before adding anyone as a volunteer or employee.
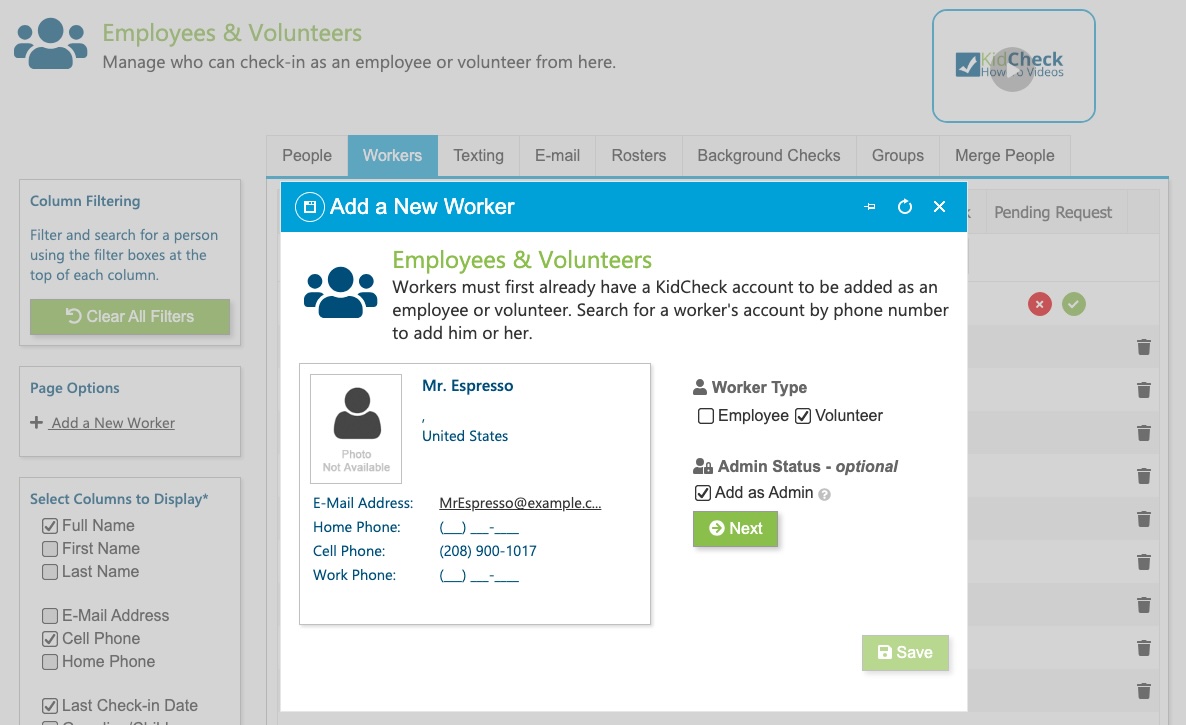
Worker/Security Role settings
Add During Check-In (Computer Stations Only)
- Enter a person’s phone number (as for regular check-in), or have a person create a new account if one they don’t have one.
- On their Check-In Dashboard (where parents select kids to check-in), select the hamburger-menu icon (three stacked horizontal lines)
- Select Worker Check-In Status.
- Enter your KidCheck admin username/password (with proper worker-management access).
- Choose to make the person a Volunteer or Employee and Enable Worker Check-In (if someone is already a worker, you’ll see a button to disable their worker status)
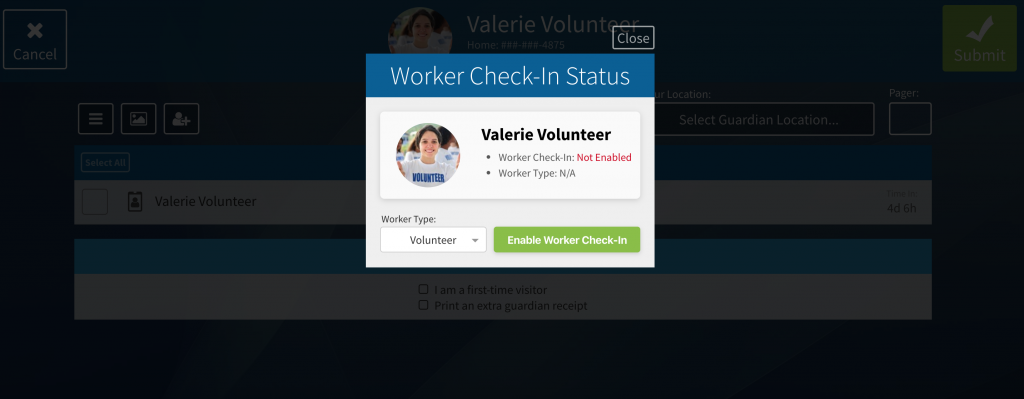
Enable worker check-in from a check-in station.
Add From the Admin Console (Computer Only)
Note: If the worker has not already created a KidCheck account, he must create an account before adding them via this method. Have him create an account first, or add him from a check-in station as he creates an account (see above).
- From Check-In or via the Utilities tab of go.kidcheck.com access the Admin Console.
- Select the gear-icon to access Admin Console Settings.
- Select the Manage Workers button.
- Enter an admin username/password (with proper worker-management access).
- Select the Add a Worker button and search for the worker by phone number.
- Select the worker in the search results, designate him as either a Volunteer or Employee, and select Add Worker.
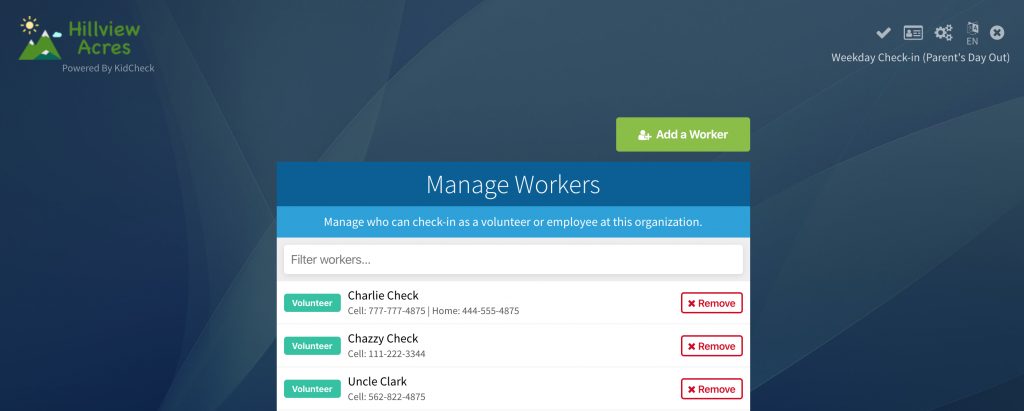
Add workers (or view existing ones) from the Admin Console on a computer.
Check-in
Volunteers and staff can check-in at the check-in station by entering their phone number (or scanning their keytag), selecting their name (and location if not selected) under the Workers section of their account, and selecting Submit to complete worker check-in. Single-use name badges can be printed (much like the child tags), or permanent, laminated badges can also be created to reduce label use.
Volunteer/Employee Training
It’s important that you take some time prior to roll out to get your volunteers and staff up-to-speed on KidCheck so they are comfortable with using it as well as answering parent questions. We suggest small group sessions, or if you have a large group consider some “train the trainer” sessions, to get a few key folks knowledgeable and they can then train small groups.
Explain the basics of KidCheck (web based, self-maintaining database, labels, set up, etc) and share some of the key benefits (improved security, streamlined check-in for greater efficiency and more time to focus on other priorities, increased parent confidence). Help them understand why you chose KidCheck.
Start KidCheck and go through the various screens so they can see first-hand what the process really looks like. Complete some sample check-ins and check-outs using their accounts to provide real-time examples.In addition to explaining the KidCheck process, discuss your organizations specific expectations for the check-in and check-out process. For example, how to greet parents, if children must be escorted post check-in or can simply go to their appropriate room, etc.
Take the time to answer their questions thoroughly to ensure they are confident in the process.
Reporting / Time Tracking
You can easily view a Volunteer/Employee’s check-in records in the Volunteer/Employee Time Report. This report quickly shows when volunteers/employees checked in/out and even automatically totals their time for your specified date ranges.
Related Links
Volunteer/Employee Training Guide
Information on check-out procedures
Information about setting up youth volunteers